.jpeg)
For many, making mooncakes at home is a way of reconnecting with heritage, while for others, it’s an exciting kitchen project that results in a treat to share with loved ones.
Among the many types of mooncakes, the traditional lotus paste mooncake stands out as the most iconic. Some are made with salted egg yolks nestled inside, symbolizing the glowing full moon. Others come without, offering a simpler but equally delicious taste. Both versions are classics, and both are worth learning.
In this guide, we’ll walk you through everything you need to know to make traditional mooncakes—whether you go with the salted egg yolk for that festive indulgence, or without for an easier everyday version. By the end, you’ll be ready to bake mooncakes that look stunning, taste authentic, and bring joy to your table.
1. A Quick History of Traditional Mooncakes
Mooncakes are deeply tied to the Mid-Autumn Festival, one of the most important celebrations across China and many parts of Asia. Families gather under the full moon to give thanks for the harvest, and mooncakes are exchanged as gifts of unity, luck, and love.
The round shape of a mooncake mirrors the full moon and represents wholeness and reunion. Adding a salted egg yolk inside elevates this symbolism—it resembles the glowing moon sitting in the night sky, which is why yolk-filled mooncakes are often the centerpiece of festive celebrations.
But not all mooncakes have yolks. Many people enjoy the plain lotus paste version for its smooth texture and subtly sweet flavor. These are often preferred by children or those who like a lighter treat. Together, both styles show the versatility and beauty of this beloved pastry.
2. Ingredients You’ll Need
Before diving into the recipe, let’s set up your kitchen with the right ingredients. Mooncakes aren’t difficult to make, but they do require some specialty items.
For the mooncake skin (outer dough):
Golden syrup – gives the dough its golden color and slight caramel flavor. (You can substitute honey in a pinch, but golden syrup is traditional.)
Lye water (alkaline water) – this small amount balances acidity and helps the dough bake into that deep golden brown.
Vegetable oil – provides moisture and makes the dough pliable.
Plain flour – the base of the dough, which comes together into a soft and workable pastry.
For the filling (base for both versions):
Lotus seed paste – the most traditional filling, smooth and mildly sweet. (If unavailable, you can also use red bean paste, which is more common in many households.)
Melon seeds (optional) – added for a crunchy texture and extra flavor.
For the salted egg yolk version:
Salted egg yolks – the star of the show. These can be bought pre-made from Asian grocery stores or prepared at home.
For finishing touches:
Egg wash – to brush on top, giving mooncakes their glossy finish.
Mooncake molds – to press the beautiful patterns into your mooncakes before baking.
📌 Tip: Don’t skip the resting time for your dough—it’s key to getting that perfectly chewy and tender mooncake skin.
3. Preparing the Salted Egg Yolks
If you’re going for the traditional yolk-filled mooncakes, this step is crucial. The salted egg yolk is what makes the pastry feel festive, rich, and symbolic of the full moon.
Buying ready-made yolks: The easiest option is to buy pre-cooked salted egg yolks from an Asian grocery store. These are usually vacuum-packed and ready to use, saving you time.
Making them at home: If you want to try from scratch, you’ll need raw duck eggs, salt, and patience. The eggs are cured in a salty brine or packed in salted charcoal for 30–40 days until the yolks turn firm, bright orange, and rich in flavor.
Once you’ve got your yolks, here’s what to do before using them:
Separate the yolks from the whites.
Rinse lightly to remove excess salt.
Steam or bake them briefly (around 10 minutes) until just cooked—this step intensifies their flavor and keeps them from being too oily.
When assembling the mooncakes, each yolk is wrapped in lotus paste so that it sits neatly in the center of the filling ball. This ensures that when you cut into the mooncake, you get that beautiful “golden moon” inside.
📌 Tip: If the yolks taste too salty, soak them in a bit of Shaoxing wine or rice wine before steaming. This softens the saltiness and adds fragrance.
4. Making the Mooncake Dough
The mooncake skin is what gives the pastry its distinct look and bite. It’s thin, slightly chewy, and golden after baking. Here’s how to make it:
Step 1 – Mix the wet ingredients
In a large bowl, combine golden syrup, lye water, and vegetable oil. Stir until the mixture is smooth. The syrup is what gives mooncake skins their rich caramel flavor, so make sure it’s well blended.
Step 2 – Add the flour
Slowly sift in plain flour and gently fold it into the wet mixture. Be careful not to overmix—this dough doesn’t need kneading. It should come together into a soft, sticky dough.
Step 3 – Rest the dough
Cover the dough with cling wrap and let it rest for at least 30 minutes to 1 hour. This resting step is vital: it allows the flour to fully absorb the liquids, making the dough smooth and easy to handle later.
Step 4 – Divide into portions
Once rested, divide the dough into small balls, usually around 20–25g each depending on the size of your mooncake mold. This outer dough will wrap around the filling, so it should be just enough to coat the paste without being too thick.
📌 Tip: A good ratio is about 30% skin to 70% filling. Too much dough, and your mooncake will taste heavy; too little, and it might break while baking.
By the end of this step, you’ll have your dough balls ready, waiting to be paired with the lotus paste filling (and salted yolks, if using).
5. Assembling the Mooncakes
Now comes the fun part—bringing everything together! Assembling mooncakes takes a little practice, but once you get the hang of it, it’s really satisfying.
Step 1 – Wrap the filling
If you’re making plain lotus paste mooncakes: Roll the paste into balls (about 30–35g each).
If you’re making salted yolk mooncakes: Take one salted egg yolk and wrap it inside about 25g of lotus paste. Roll into a smooth ball.
This step ensures the yolk is nicely centered when you cut into the mooncake.
Step 2 – Flatten the dough
Take one piece of dough (about 20–25g). Place it between two pieces of baking paper or lightly floured hands, and flatten into a round disc. Try to keep the edges a little thinner than the middle.
Step 3 – Encase the filling
Place the filling ball in the center of the dough disc. Carefully lift the edges of the dough up and around the filling, pinching gently until it closes at the top. Roll it lightly between your palms to smoothen the ball.
📌 Tip: If the dough sticks, dust your hands with a little flour—but don’t overdo it, or the surface will crack later.
Step 4 – Mold the mooncake
Lightly flour your mooncake mold (wooden or plastic). Place the filled ball inside, press gently but firmly, then release. You’ll see that beautiful patterned imprint—classic mooncake style.
Repeat with the remaining dough and filling until all your mooncakes are molded.
6. Baking to Perfection
Baking mooncakes is a two-step process: first, a short bake to set the shape; then, a second bake after brushing with egg wash for that golden glow.
Step 1 – First bake (set the shape)
Preheat your oven to 180°C (350°F). Place the mooncakes on a lined baking tray and bake for 8–10 minutes. This step helps the dough firm up, so the pattern doesn’t collapse later.
Step 2 – Rest and egg wash
Take the mooncakes out and let them cool for about 10 minutes. Brush the tops lightly with a beaten egg yolk (thinned with a little water). This is what gives mooncakes their signature golden shine.
Step 3 – Second bake
Return them to the oven and bake for another 10–12 minutes, or until they’re golden brown. Don’t overbake—mooncake skins are meant to be thin and soft, not crunchy.
Step 4 – The resting period (important!)
Here’s the secret: fresh-baked mooncakes actually taste better after a couple of days. Once cooled, store them in an airtight container for 2–3 days. During this time, the skin softens and develops that shiny, slightly oily look we associate with bakery mooncakes. This process is called “returning the oil.”
📌 Tip: If your mooncakes look a little dry after baking, don’t panic—they’ll improve after resting.
By now, you’ve got beautiful, glossy mooncakes ready to be enjoyed with family, friends, and of course, a cup of hot tea.
7. Storing and Serving Your Mooncakes
Once your mooncakes have rested for 2–3 days, they’re at their absolute best—shiny, soft-skinned, and full of rich flavor. Here’s how to store and enjoy them properly:
Storing tips
Room temperature: Keep in an airtight container at room temp for up to 5 days. Perfect if you plan to share them quickly.
Refrigeration: If you need longer storage, refrigerate them for up to 2 weeks. Just let them come back to room temperature before serving, so the skin softens again.
Freezing: You can freeze mooncakes (uncut) for up to a month. Wrap tightly in cling film, then in a freezer bag. Thaw at room temperature before enjoying.
Serving tips
Cut mooncakes into wedges with a sharp knife (a serrated knife works best). Traditionally, they’re served in quarters or eighths, especially with rich fillings.
Pair them with Chinese tea—like jasmine, oolong, or pu-erh—which balances out the sweetness.
For salted egg yolk versions, a pot of green tea is perfect to cleanse the palate.
Mooncakes aren’t just food—they’re an experience. Sharing them with friends and family is what makes the Mid-Autumn Festival so special.
8. Variations Without Salted Egg Yolks
Not everyone loves salted egg yolks, and that’s totally fine. Mooncakes are incredibly versatile, and there are plenty of delicious alternatives you can make at home.
Classic lotus seed paste (no yolk):
Just wrap the dough around plain lotus paste balls. It’s lighter and perfect for those who prefer something smooth and sweet.
Red bean paste mooncakes:
A popular option with a slightly earthy flavor. Sweetened red bean paste (anko) makes a soft, comforting filling.
Mixed nut mooncakes (Five Kernel):
A crunchier, nutty version made with chopped walnuts, almonds, sesame seeds, melon seeds, and candied fruits. No yolks required!
Modern fillings:
Chocolate ganache, matcha paste, pandan custard, or even ice cream for trendy snow-skin mooncakes. These options are fun, creative, and perfect for experimenting.
So whether you’re a fan of the classic salted yolk richness or want to try modern twists, there’s a mooncake out there for you.
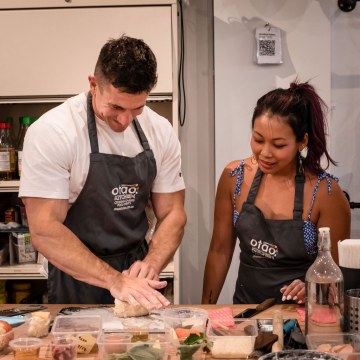
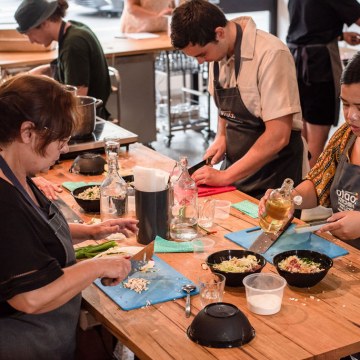
9. Final Thoughts: Make Mooncakes with Otao Kitchen
Mooncakes are more than a festive treat—they’re about tradition, sharing, and celebration. Making them at home is rewarding, but learning in a hands-on class takes the experience to another level.
That’s where Otao Kitchen’s Mooncake Making Class in Melbourne comes in. In this fun and interactive workshop, you’ll:
Learn step-by-step techniques from expert chefs.
Get hands-on practice molding, filling, and baking mooncakes.
Try different fillings, including traditional lotus and salted egg yolk, as well as modern flavors.
Take home your own beautiful mooncakes to share with family and friends.
Whether you’re celebrating the Mid-Autumn Festival, looking for a unique cultural experience, or just love baking, this class is the perfect way to connect food, tradition, and community.
👉 So why not skip the store-bought boxes this year and make your own? Book your spot in Otao Kitchen’s Mooncake Making Class and celebrate the season with mooncakes made by you.


.jfif)


 " style="-webkit-font-smoothing: antialiased; color: rgb(46, 145, 252);">Buy On Amazon Fr $16.99